SUSE Adaptive Telco Infrastructure Platform (ATIP)
SUSE ATIP is a platform designed for hosting modern, cloud native, Telco applications at scale from core to edge.
This section documents how to configuration telco specific features on ATIP deployed clusters
We will cover the next topics:
- Bios configuration: Bios configuration to be used by the real time kernel to optimize the performance in the hardware.
- Kernel image for Real Time: Kernel image to be used by the real time kernel.
- CPU Tuned configuration: Tuned configuration to be used by the real time kernel.
- Multus-Calico configuration: Multus configuration to be used by the kubernetes cluster.
- SRIOV configuration: SRIOV configuration to be used by the kubernetes workloads.
- DPDK configuration: DPDK configuration to be used by system.
- Huge Pages: Huge Pages configuration to be used by the kubernetes workloads.
- CPU Pinning configuration: CPU Pinning configuration to be used by the kubernetes workloads.
- NUMA Aware scheduling configuration: NUMA Aware scheduling configuration to be used by the kubernetes workloads.
- Metal LB configuration: Metal LB configuration to be used by the kubernetes workloads.
Bios configuration
Note: This configuration depends on the hardware vendor, so please, check with your hardware vendor the best configuration to be used.
This section is really important to optimize the performance of the real time kernel in the hardware, because some of this parameters could increase not limiting the performance of the real time kernel. The next table shows the recommended configuration for the most common hardware vendors:
| Option | Value | Description |
|---|---|---|
| Workload Profile | Telco Optimized | Telco profile to optimize the performance in the hardware. |
| Boot Performance Mode | Max. Performance | Maximize the performance in the boot process. |
| Hyper- Threading (Logical Proccesor) | Enable | This option enables Intel® Hyper-Threading Technology for logical processor enabling and converting processor cores (pCores) to logical cores (lCores). |
| Virtualization Technology (XAPIC) | Enable | This option is for Extended Advanced Programmable Interrupt Controller (xAPIC) support for the Intel® Virtualization Technology for Directed I/O (Intel® VT-d) feature. |
| uncore frequency scaling | Disable | If enabled, Uncore Frequency Scaling (UFS) allows the uncore to operate at a lower frequency when the Power Control Unit (PCU) has detected low utilization. Conversely, UFS allows the uncore to operate at a higher frequency when the PCU has detected high utilization. |
| CPU P-State Control (EIST PSD Function | HW_ALL | optimization of the voltage and CPU fequency during operation |
| CPU C-State Control | Disable | This option is for the CPU C-State Control feature, which provides power savings by placing the processor into lower power states when the processor is idle. |
| CPU C1E Support | Disable | This option is for the CPU Enhanced Halt (C1E) feature, which provides power savings by placing the processor into a low power state when the processor is idle. |
| AVX License Pre-Grant | Enable | If enabled, this option enables the pre-grant license level selection based on workload with the AVX ICCP Pre-Grant Level option. |
| AVX ICCP Pre- Grant Level | Level 5 | This option selects a workload level for the Intel® Advanced Vector Extensions (Intel® AVX): Intel® AVX-512 Heavy |
| AVX P1 | Level 2 | This option serves a dual purpose: 1 -Specifies the base P1 ratio for Intel® Streaming SIMD Extensions (Intel® SSE) or Intel® AVX workloads. 2- Pre-grants a license level based on the workload level. |
| Energy Efficient Turbo | Disable | This option allows entry into the Intel® Turbo Boost Technology frequency when the Power Control Unit (PCU) has detected high utilization. |
| Turbo Mode | Enable | Enabling this Intel® Turbo Boost Technology mode setting allows the CPU cores to operate at higher than the rated frequency. |
| GPSS timer | 0us | This option allows the reduction of the Global P-State Selection (GPSS) timer to be set from: 0 μs to 500 μs |
| LLC prefetch | Enable | This option enables Last Level Cache (LLC) hardware prefetch logic. |
| Frequency Prioritization (RAPL Prioritization) | Disable | This setting controls whether the Running Average Power Limit (RAPL) balancer is enabled. If enabled, it activates per core power budgeting. |
| Hardware P-States | Native with no Legacy Support | When enabled, this option allows the hardware to choose a Performance State (P-State) based on an OS request (that is, a legacy P-State). |
| EPP enable3 | Disable | When this option is enabled, the system uses the energy performance bias register for the Energy Performance Preference (EPP) input to make decision on Performance State (P-State) or Processor Core Idle State (C-State) transitions. |
| APS Rocketing | Disable | Rocketing mechanism in the HWP p-state selection for pcode algorithm. Rocketing enables the core ratio to jump to max turbo instantaneously as opposed to a smooth ramp |
| Scalability | Disable | Core Performance to frequency scalability based on optimizations in the CPU. |
| Native ASPM | Disable | ASPM off not controlled by BIOS or OS. |
| Power Performance Tuning | OS Controls EPB | This option selects the BIOS or OS that controls the Energy Performance Bias (EPB) functionality. |
| Workload Configuration | I/O sensitive | This option allows the system power and performance profile to be set to favor compute intensive workload or I/O sensitive workload. |
| Dynamic L1 | Disable | This option applies only to the package-level setting to allow dynamically entering the lower power link state L1. |
| Set Fan Profile | Performance | This option allows the fan profile to be set to Performance, Balanced, or Quiet. |
| Cooling Configuration - Fan Speed Offset | Medium | This option allows the fan speed offset to be set to Low, Medium, or High. |
Kernel Real Time
The real time kernel image is not necessarily better than a standard kernel. It is a different kernel tuned to a specific use case. The real time kernel is tuned for lower latency at the cost of throughput. The real time kernel is not recommended for general purpose use, but in our case, this is the recommended kernel for Telco Workloads.
There are 4 top features:
- Deterministic Execution:
Get greater predictability – ensure critical business processes complete in time, every time and deliver high quality of service, even under heavy system loads. By shielding key system resources for high-priority processes, you can ensure greater predictability for time-sensitive applications.
- Low Jitter:
The low jitter built upon the highly deterministic technology helps to keep applications synchronized with the real world. This helps services that need ongoing and repeated calculation.
- Priority Inheritance:
Priority inheritance refers to the ability of a lower priority process to assume a higher priority when there is a higher priority process that requires the lower priority process to finish before it can accomplish its task. SUSE Linux Enterprise Real Time solves these priority inversion problems for mission-critical processes.
- Thread Interrupts:
Processes running in interrupt mode in a general-purpose operating system are not preemptible. With SUSE Linux Enterprise Real Time these interrupts have been encapsulated by kernel threads, which are interruptible, and in turn allow the hard and soft interrupts to be preempted by user-defined higher priority processes.
In our case, if you have installed a real time image like SLE Micro RT, kernel real time is already installed and you don't need to install it again.
You could check it looking for the kernel and see if contains the rt string at the end of the kernel info:
uname -r
5.14.21-150400.15.11-rt
For more information about the real time kernel, please visit https://www.suse.com/products/realtime/
CPU Tuned Configuration
The first thing is to create a profile for the cpu cores we want to isolate. In this case, we will isolate the cores 1-30 and 33-62.
echo "export tuned_params" >> /etc/grub.d/00_tuned

echo "isolated_cores=1-30,33-62" >> /etc/tuned/cpu-partitioning-variables.conf

tuned-adm profile cpu-partitioning
Cannot talk to Tuned daemon via DBus. Is Tuned daemon running?
Trying to (re)start tuned...
Tuned (re)started, changes applied.
Then we need to modify grub option to isolate cpu cores as well as another important parameters for the cpu usage.
Modify in /etc/default/grub the next line, to add the cpu cores to isolate. The next options are the most important to be customized with your current hardware:
| parameter | value | description |
|---|---|---|
| isolcpu | 1-30,33-62 | Isolate the cores 1-30 and 33-62 |
| skew_tick | 1 | This option allows the kernel to skew the timer interrupts across the isolated CPUs. |
| nohz | on | This option allows the kernel to run the timer tick on a single CPU when the system is idle. |
| nohz_full | 1-30,33-62 | kernel boot parameter is the current main interface to configure full dynticks along with CPU Isolation. |
| rcu_nocbs | 1-30,33-62 | This option allows the kernel to run the RCU callbacks on a single CPU when the system is idle. |
| kthread_cpus | 0,31,32,63 | This option allows the kernel to run the kthreads on a single CPU when the system is idle. |
| irqaffinity | 0,31,32,63 | This option allows the kernel to run the interrupts on a single CPU when the system is idle. |
| processor.max_cstate | 1 | This option prevents the CPU from dropping into a sleep state when idle |
| intel_idle.max_cstate | 0 | This option disables the intel_idle driver and allows acpi_idle to be used |
With the values showed above, we are isolating 60 cores, and we are using 4 cores for the OS.
Let's modify the grub file with the previous values:
vi /boot/efi/EFI/sle_rt/grub.cfg
	set tuned_params="skew_tick=1 nohz=on nohz_full=1-30,33-62 rcu_nocbs=1-30,33-62 tuned.non_isolcpus=80000001,80000001 nosoftlockup"

vi /etc/default/grub
    GRUB_CMDLINE_LINUX="intel_iommu=on intel_pstate=passive processor.max_cstate=1 intel_idle.max_cstate=0 iommu=pt usbcore.autosuspend=-1 selinux=0 enforcing=0 nmi_watchdog=0 crashkernel=auto softlockup_panic=0 audit=0 mce=off hugepagesz=1G hugepages=40 hugepagesz=2M hugepages=0 default_hugepagesz=1G kthread_cpus=0,31,32,63 irqaffinity=0,31,32,63 isolcpu=1-30,33-62 skew_tick=1 nohz_full=1-30,33-62 rcu_nocbs=1-30,33-62 rcu_nocb_poll"

transactional-update grub.cfg
To validate that the parameters are applied after reboot, you could check:
cat /proc/cmdline
Multus + Calico
Multus CNI is a CNI plugin that enables attaching multiple network interfaces to pods. Multus does not replace CNI plugins, instead it acts as a CNI plugin multiplexer. Multus is useful in certain use cases, especially when pods are network intensive and require extra network interfaces that support dataplane acceleration techniques such as SR-IOV.
Multus can not be deployed standalone. It always requires at least one conventional CNI plugin that fulfills the Kubernetes cluster network requirements. That CNI plugin becomes the default for Multus, and will be used to provide the primary interface for all pods. In our case, most of the workloads in Telco will be deployed using Multus + calico.
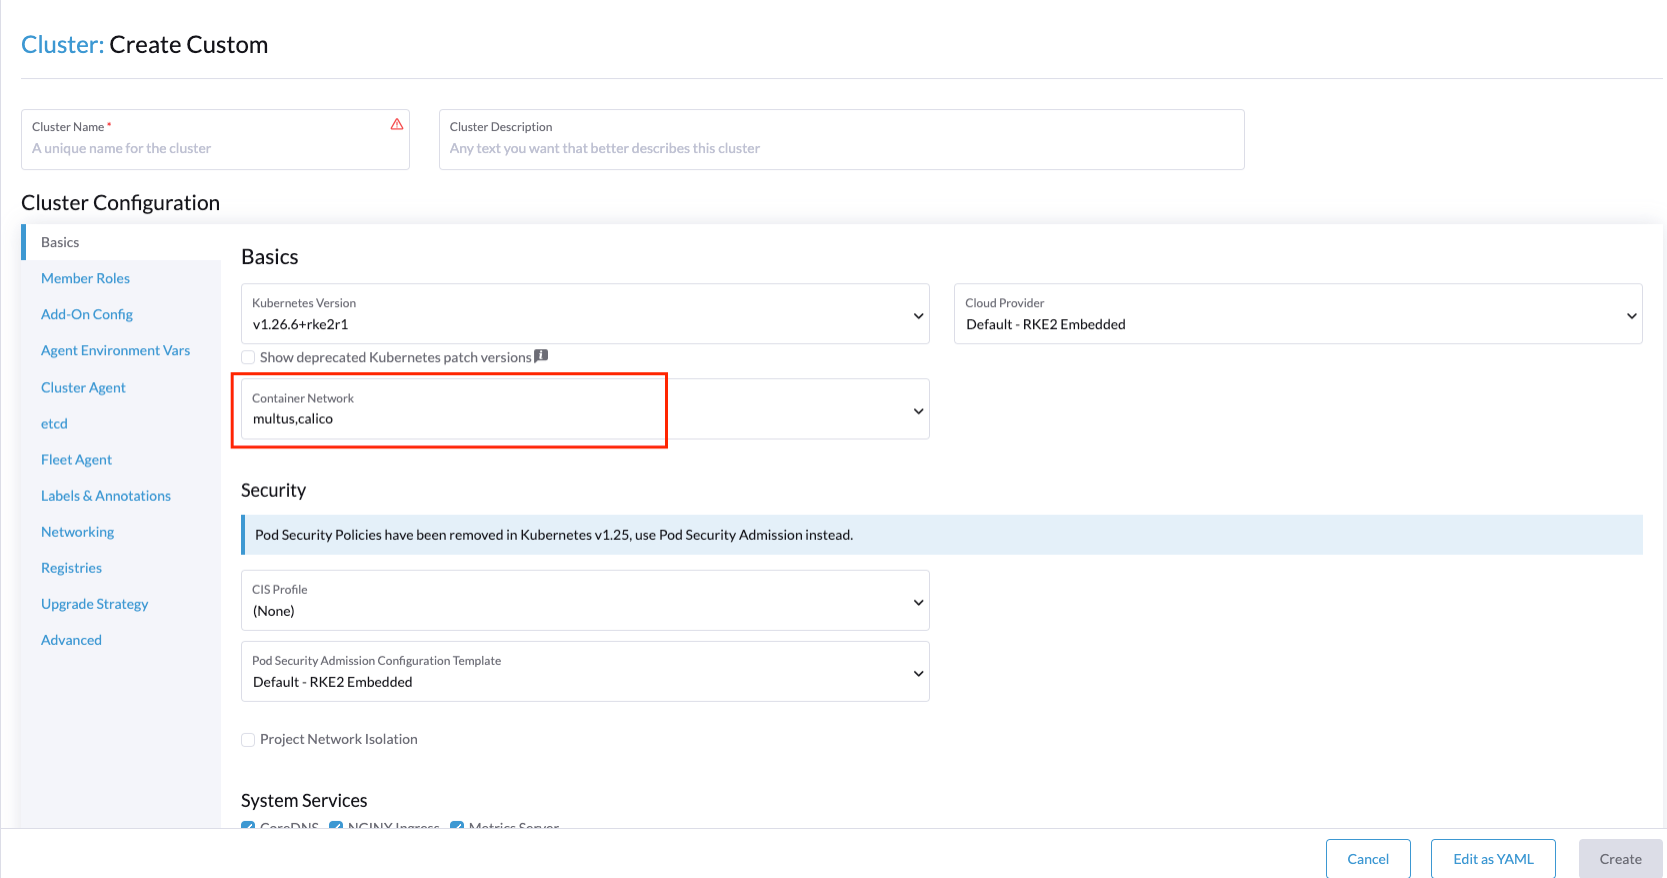
To enable Multus on RKE2 cluster, add multus as the first list entry in the cni config key, followed by the name of the plugin you want to use alongside Multus (or none if you will provide your own default plugin). Note that multus must always be in the first position of the list. For example, to use Multus with calico as the default plugin you could specify:
# /etc/rancher/rke2/config.yaml
cni:
- multus
- calico
This can also be specified with command-line arguments, i.e. --cni=multus,calico or --cni=multus --cni=calico.
You could also install Multus directly during the edge cluster installation:
For more information about Multus, please visit https://github.com/k8snetworkplumbingwg/multus-cni
For more information about CNI plugins, please visit https://docs.rke2.io/install/network_options
SRIOV
SR-IOV allows a device, such as a network adapter, to separate access to its resources among various PCIe hardware functions. There are different ways to deploy SRIOV, and in this case, we will show two different options:
-
Option 1: using the SRIOV CNI device plugins and a config map to configure it properly.
-
Option 2: using the SRIOV helm chart from Rancher to make this deployment easy.
Option 1 - Installation of SR-IOV CNI device plugins and a config map to configure it properly
Prepare the config map for the device plugin
You could get the information to fill the config map from the lspci command:
lspci | grep -i acc
8a:00.0 Processing accelerators: Intel Corporation Device 0d5c

lspci | grep -i net
xr11-1:~ # lspci | grep -i net
19:00.0 Ethernet controller: Broadcom Inc. and subsidiaries BCM57504 NetXtreme-E 10Gb/25Gb/40Gb/50Gb/100Gb/200Gb Ethernet (rev 11)
19:00.1 Ethernet controller: Broadcom Inc. and subsidiaries BCM57504 NetXtreme-E 10Gb/25Gb/40Gb/50Gb/100Gb/200Gb Ethernet (rev 11)
19:00.2 Ethernet controller: Broadcom Inc. and subsidiaries BCM57504 NetXtreme-E 10Gb/25Gb/40Gb/50Gb/100Gb/200Gb Ethernet (rev 11)
19:00.3 Ethernet controller: Broadcom Inc. and subsidiaries BCM57504 NetXtreme-E 10Gb/25Gb/40Gb/50Gb/100Gb/200Gb Ethernet (rev 11)
51:00.0 Ethernet controller: Intel Corporation Ethernet Controller E810-C for QSFP (rev 02)
51:00.1 Ethernet controller: Intel Corporation Ethernet Controller E810-C for QSFP (rev 02)
51:01.0 Ethernet controller: Intel Corporation Ethernet Adaptive Virtual Function (rev 02)
51:01.1 Ethernet controller: Intel Corporation Ethernet Adaptive Virtual Function (rev 02)
51:01.2 Ethernet controller: Intel Corporation Ethernet Adaptive Virtual Function (rev 02)
51:01.3 Ethernet controller: Intel Corporation Ethernet Adaptive Virtual Function (rev 02)
51:11.0 Ethernet controller: Intel Corporation Ethernet Adaptive Virtual Function (rev 02)
51:11.1 Ethernet controller: Intel Corporation Ethernet Adaptive Virtual Function (rev 02)
51:11.2 Ethernet controller: Intel Corporation Ethernet Adaptive Virtual Function (rev 02)
51:11.3 Ethernet controller: Intel Corporation Ethernet Adaptive Virtual Function (rev 02)
0d5dis the VF from the FEC card (take a look that it's different than the lspci | grep acc result, because it's the VF, not the PF). Normally it's the first VF of the card, so the last name will be consecutive after VF creation.
The config map consists of a JSON file that describe devices using filters to discover and creates some groups for the interfaces. The most important is to understand the filters and the groups. The filters are used to discover the devices and the groups are used to create the interfaces.
For example, we could filter using:
- vendorID:
8086(Intel) - deviceID:
0d5d(FEC) - driver:
vfio-pci(SRIOV driver) - pfNames:
p2p1(PF name)
We could also set placesholders like:
- pfNames: ["eth1#1,2,3,4,5,6"]
Regarding the groups, we could create a group for the FEC card and another group for the Intel card even creating some prefix depending our use case:
- resourceName:
pci_sriov_net_bh_dpdk - resourcePrefix:
Rancher.io
There are a lot of combinations in order to discover and create the resource group to allocate some VFs to the pods.
For more information about the filters and groups, please visit https://github.com/k8snetworkplumbingwg/sriov-network-device-plugin
cat <<EOF | k apply -f -
apiVersion: v1
kind: ConfigMap
metadata:
  name: sriovdp-config
  namespace: kube-system
data:
  config.json: |
    {
        "resourceList": [
            {
                "resourceName": "intel_fec_5g",
                "devicetype": "accelerator",
                "selectors": {
                    "vendors": ["8086"],
                    "devices": ["0d5d"]
                }
            },
            {
                "resourceName": "intel_sriov_odu",
                "selectors": {
                    "vendors": ["8086"],
                    "devices": ["1889"],
                    "drivers": ["vfio-pci"],
                    "pfNames": ["p2p1"]
                }
            },
            {
                "resourceName": "intel_sriov_oru",
                "selectors": {
                    "vendors": ["8086"],
                    "devices": ["1889"],
                    "drivers": ["vfio-pci"],
                    "pfNames": ["p2p2"]
                }
            }
        ]
    }
EOF
Prepare the daemonset for the device plugin
No changes are needed in the daemonset, so you can use the same upstream daemonset file.
cat <<EOF | k apply -f -
---
apiVersion: v1
kind: ServiceAccount
metadata:
  name: sriov-device-plugin
  namespace: kube-system

---
apiVersion: apps/v1
kind: DaemonSet
metadata:
  name: kube-sriov-device-plugin-amd64
  namespace: kube-system
  labels:
    tier: node
    app: sriovdp
spec:
  selector:
    matchLabels:
      name: sriov-device-plugin
  template:
    metadata:
      labels:
        name: sriov-device-plugin
        tier: node
        app: sriovdp
    spec:
      hostNetwork: true
      nodeSelector:
        kubernetes.io/arch: amd64
      tolerations:
      - key: node-role.kubernetes.io/master
        operator: Exists
        effect: NoSchedule
      serviceAccountName: sriov-device-plugin
      containers:
      - name: kube-sriovdp
        image: ghcr.io/k8snetworkplumbingwg/sriov-network-device-plugin:latest-amd64
        imagePullPolicy: IfNotPresent
        args:
        - --log-dir=sriovdp
        - --log-level=10
        securityContext:
          privileged: true
        resources:
          requests:
            cpu: "250m"
            memory: "40Mi"
          limits:
            cpu: 1
            memory: "200Mi"
        volumeMounts:
        - name: devicesock
          mountPath: /var/lib/kubelet/
          readOnly: false
        - name: log
          mountPath: /var/log
        - name: config-volume
          mountPath: /etc/pcidp
        - name: device-info
          mountPath: /var/run/k8s.cni.cncf.io/devinfo/dp
      volumes:
        - name: devicesock
          hostPath:
            path: /var/lib/kubelet/
        - name: log
          hostPath:
            path: /var/log
        - name: device-info
          hostPath:
            path: /var/run/k8s.cni.cncf.io/devinfo/dp
            type: DirectoryOrCreate
        - name: config-volume
          configMap:
            name: sriovdp-config
            items:
            - key: config.json
              path: config.json
EOF
After that you should see the pods running:
kubectl get pods -n kube-system | grep sriov
kube-system       kube-sriov-device-plugin-amd64-twjfl                    1/1     Running   0          2m
- Check the interfaces discovered and available in the nodes to be used by the pods:
kubectl get $(kubectl get nodes -oname) -o jsonpath='{.status.allocatable}' | jq
{
  "cpu": "64",
  "ephemeral-storage": "256196109726",
  "hugepages-1Gi": "40Gi",
  "hugepages-2Mi": "0",
  "intel.com/intel_fec_5g": "1",
  "intel.com/intel_sriov_odu": "4",
  "intel.com/intel_sriov_oru": "4",
  "memory": "221396384Ki",
  "pods": "110"
}
-
The FEC will be
intel.com/intel_fec_5gand the value will be 1 -
The VF will be
intel.com/intel_sriov_oduorintel.com/intel_sriov_oruif you deploy it with device plugin and the config map without helm charts
Important Note: If you don't get the interfaces available here, does not make sense continue with the workload, because interface will not be available for pods
Option 2 - Installation using Rancher using Helm chart for SR-IOV CNI and device plugins
Get helm if not present
curl -fsSL -o get_helm.sh https://raw.githubusercontent.com/helm/helm/master/scripts/get-helm-3
chmod 500 get_helm.sh
./get_helm.sh
Install SRIOV
This part could be done in two ways, using the CLI or using the Rancher UI
- Install Operator from CLI
helm repo add rancher-charts https://raw.githubusercontent.com/rancher/charts/dev-v2.7/
helm install sriov-crd rancher-charts/sriov-crd
helm install sriov rancher-charts/sriov -n kube-system
- Install Operator from Rancher UI
Once your cluster is installed and you have access to the Rancher UI, you can install the SR-IOV Operator from the Rancher UI from the apps tab:
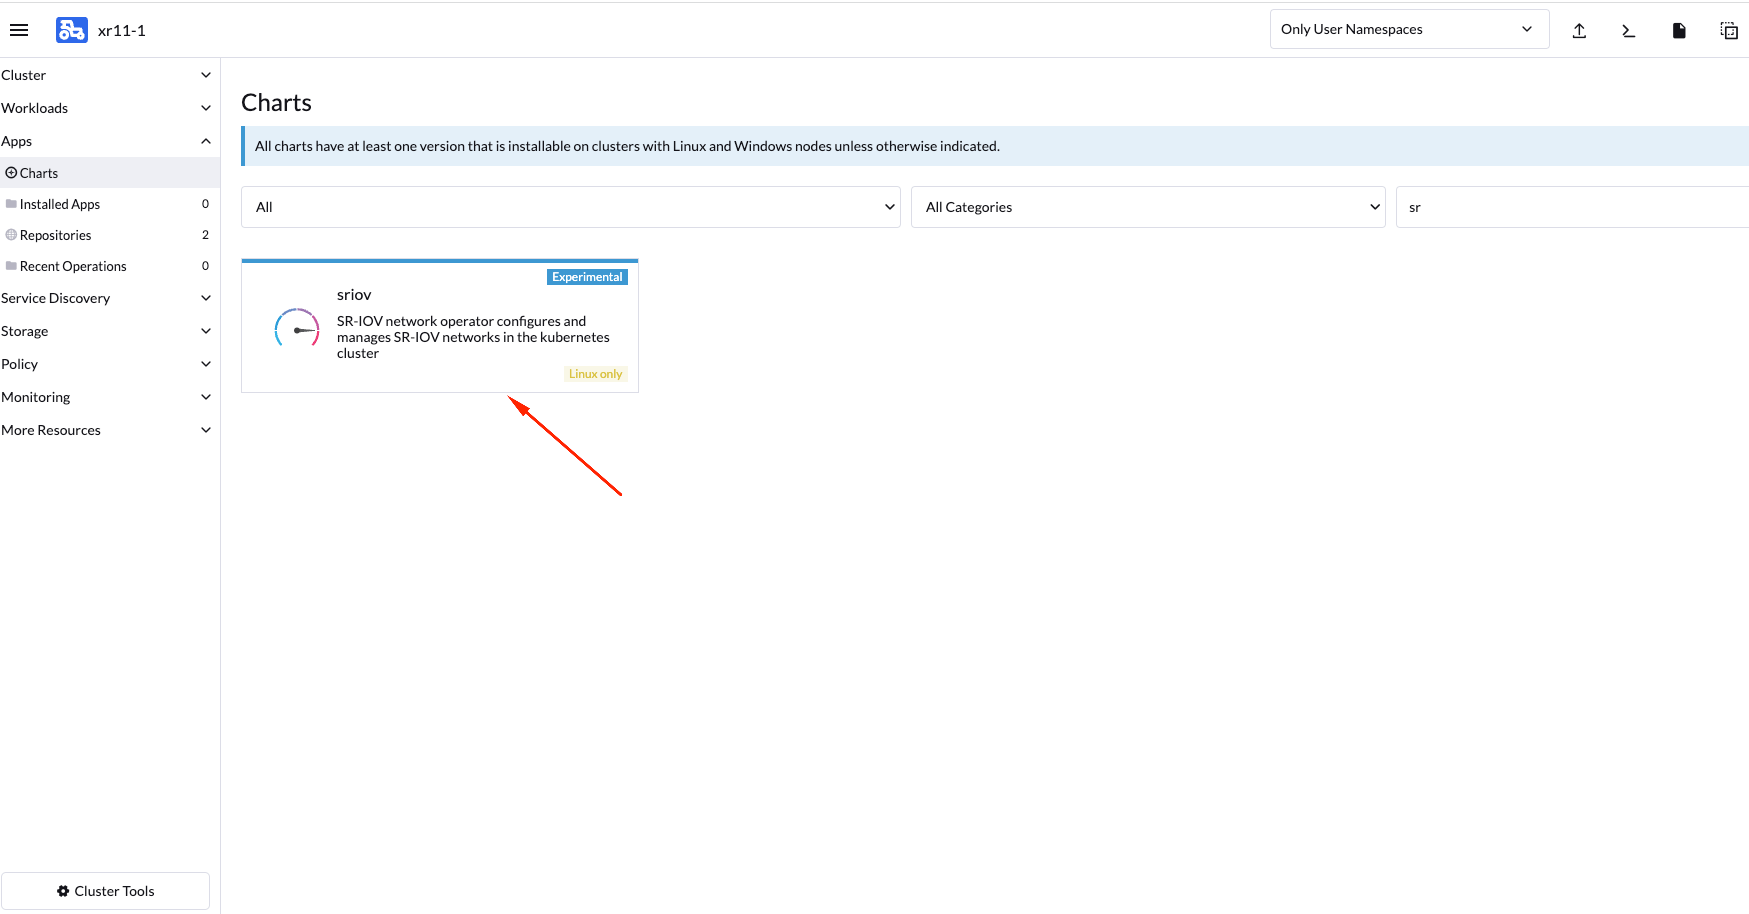
Check the deployed resources crd and pods
kubectl -n sriov-network-operator get crd
kubectl -n sriov-network-operator get pods
Check the label in the nodes
Now, if you have all resources running, the label should appears automatically in your node:
kubectl get nodes -oyaml | grep feature.node.kubernetes.io/network-sriov.capable
    feature.node.kubernetes.io/network-sriov.capable: "true"
if not present, you can add it manually:
kubectl label $(kubectl get nodes -oname) feature.node.kubernetes.io/network-sriov.capable=true
Review the daemonset to see the new sriov-network-config-daemon and sriov-rancher-nfd-worker as active and ready
kubectl get daemonset -A
NAMESPACE             NAME                            DESIRED   CURRENT   READY   UP-TO-DATE   AVAILABLE   NODE SELECTOR                                           AGE
calico-system         calico-node                     1         1         1       1            1           kubernetes.io/os=linux                                  15h
cattle-sriov-system   sriov-network-config-daemon     1         1         1       1            1           feature.node.kubernetes.io/network-sriov.capable=true   45m
cattle-sriov-system   sriov-rancher-nfd-worker        1         1         1       1            1           <none>                                                  45m
kube-system           rke2-ingress-nginx-controller   1         1         1       1            1           kubernetes.io/os=linux                                  15h
kube-system           rke2-multus-ds                  1         1         1       1            1           kubernetes.io/arch=amd64,kubernetes.io/os=linux         15h
After some minutes (can take up to 10 min to be updated) the nodes detected and configured will appear:
kubectl get sriovnetworknodestates.sriovnetwork.openshift.io -A
NAMESPACE             NAME     AGE
cattle-sriov-system   xr11-2   83s
Check the interfaces detected
the interfaces discovered should be the pci address of the network device. Check this information with lspci command in the host.
$ kubectl get sriovnetworknodestates.sriovnetwork.openshift.io -n kube-system -oyaml
apiVersion: v1
items:
- apiVersion: sriovnetwork.openshift.io/v1
  kind: SriovNetworkNodeState
  metadata:
    creationTimestamp: "2023-06-07T09:52:37Z"
    generation: 1
    name: xr11-2
    namespace: cattle-sriov-system
    ownerReferences:
    - apiVersion: sriovnetwork.openshift.io/v1
      blockOwnerDeletion: true
      controller: true
      kind: SriovNetworkNodePolicy
      name: default
      uid: 80b72499-e26b-4072-a75c-f9a6218ec357
    resourceVersion: "356603"
    uid: e1f1654b-92b3-44d9-9f87-2571792cc1ad
  spec:
    dpConfigVersion: "356507"
  status:
    interfaces:
    - deviceID: "1592"
      driver: ice
      eSwitchMode: legacy
      linkType: ETH
      mac: 40:a6:b7:9b:35:f0
      mtu: 1500
      name: p2p1
      pciAddress: "0000:51:00.0"
      totalvfs: 128
      vendor: "8086"
    - deviceID: "1592"
      driver: ice
      eSwitchMode: legacy
      linkType: ETH
      mac: 40:a6:b7:9b:35:f1
      mtu: 1500
      name: p2p2
      pciAddress: "0000:51:00.1"
      totalvfs: 128
      vendor: "8086"
    syncStatus: Succeeded
kind: List
metadata:
  resourceVersion: ""
Note: If your interface is not detected here you should ensure that it is present in the next config map
kubectl get cm supported-nic-ids -oyaml -n cattle-sriov-systemif your device is not there you have to edit the config map adding the right values to be discovered (should be necessary to restart the daemonset sriov-network-config-daemon)
Create the NetworkNode Policy to configure the VFs
Basically, you will create some VFs (numVfs) from the device (rootDevices) and will be configured with the driver (deviceType) and the MTU (mtu):
cat <<EOF | kubectl apply -f -
apiVersion: sriovnetwork.openshift.io/v1
kind: SriovNetworkNodePolicy
metadata:
  name: policy-dpdk
  namespace: kube-system
spec:
  nodeSelector:
    feature.node.kubernetes.io/network-sriov.capable: "true"
  resourceName: intelnicsDpdk
  deviceType: vfio-pci
  numVfs: 8
  mtu: 1500
  nicSelector:
    deviceID: "1592"
    vendor: "8086"
    rootDevices:
    - 0000:51:00.0
EOF
Validate configurations
kubectl get $(kubectl get nodes -oname) -o jsonpath='{.status.allocatable}' | jq
{
  "cpu": "64",
  "ephemeral-storage": "256196109726",
  "hugepages-1Gi": "60Gi",
  "hugepages-2Mi": "0",
  "intel.com/intel_fec_5g": "1",
  "memory": "200424836Ki",
  "pods": "110",
  "rancher.io/intelnicsDpdk": "8"
}
Create the sriov network (Optional, in case we need a different network):
cat <<EOF | k apply -f -
apiVersion: sriovnetwork.openshift.io/v1
kind: SriovNetwork
metadata:
  name: network-dpdk
  namespace: kube-system
spec:
  ipam: |
    {
      "type": "host-local",
      "subnet": "192.168.0.0/24",
      "rangeStart": "192.168.0.20",
      "rangeEnd": "192.168.0.60",
      "routes": [{
        "dst": "0.0.0.0/0"
      }],
      "gateway": "192.168.0.1"
    }
  vlan: 500
  resourceName: intelnicsDpdk
EOF
Check the network created:
kubectl get network-attachment-definitions.k8s.cni.cncf.io -A -oyaml

apiVersion: v1
items:
- apiVersion: k8s.cni.cncf.io/v1
  kind: NetworkAttachmentDefinition
  metadata:
    annotations:
      k8s.v1.cni.cncf.io/resourceName: rancher.io/intelnicsDpdk
    creationTimestamp: "2023-06-08T11:22:27Z"
    generation: 1
    name: network-dpdk
    namespace: kube-system
    resourceVersion: "13124"
    uid: df7c89f5-177c-4f30-ae72-7aef3294fb15
  spec:
    config: '{ "cniVersion":"0.3.1", "name":"network-dpdk","type":"sriov","vlan":500,"vlanQoS":0,"ipam":{"type":"host-local","subnet":"192.168.0.0/24","rangeStart":"192.168.0.10","rangeEnd":"192.168.0.60","routes":[{"dst":"0.0.0.0/0"}],"gateway":"192.168.0.1"}
      }'
kind: List
metadata:
  resourceVersion: ""
DPDK
Kernel parameters
To use dpdk using some drivers we need to enable some parameters in the kernel:
| parameter | value | description |
|---|---|---|
| iommu | pt | This option allows to use vfio for the dpdk interfaces |
| intel_iommu | on | This option enables to use vfio for VFs. |
To enable this parameters we need to add them to the kernel command line:
vi /etc/default/grub
GRUB_CMDLINE_LINUX="intel_iommu=on intel_pstate=passive processor.max_cstate=1 intel_idle.max_cstate=0 iommu=pt usbcore.autosuspend=-1 selinux=0 enforcing=0 nmi_watchdog=0 crashkernel=auto softlockup_panic=0 audit=0 mce=off hugepagesz=1G hugepages=40 hugepagesz=2M hugepages=0 default_hugepagesz=1G kthread_cpus=0,31,32,63 irqaffinity=0,31,32,63 isolcpu=1-30,33-62 skew_tick=1 nohz_full=1-30,33-62 rcu_nocbs=1-30,33-62 rcu_nocb_poll"
Then you need to update the grub configuration and reboot the system to apply the changes:
transactional-update grub.cfg
reboot
To validate that the parameters are applied after the reboot you can check the command line:
cat /proc/cmdline
Load vfio-pci kernel module
modprobe vfio-pci
Create VFs from the NICs
To create 4 VFs PCI addresses for example for 2 different NICs we need to execute the following commands:
echo 4 > /sys/bus/pci/devices/0000:51:00.0/sriov_numvfs

echo 4 > /sys/bus/pci/devices/0000:51:00.1/sriov_numvfs
Bind the new VFs with the vfio-pci driver
dpdk-devbind.py -b vfio-pci 0000:51:01.0 0000:51:01.1 0000:51:01.2 0000:51:01.3 0000:51:11.0 0000:51:11.1 0000:51:11.2 0000:51:11.3
Review the configuration applied:
dpdk-devbind.py -s

Network devices using DPDK-compatible driver
============================================
0000:51:01.0 'Ethernet Adaptive Virtual Function 1889' drv=vfio-pci unused=iavf,igb_uio
0000:51:01.1 'Ethernet Adaptive Virtual Function 1889' drv=vfio-pci unused=iavf,igb_uio
0000:51:01.2 'Ethernet Adaptive Virtual Function 1889' drv=vfio-pci unused=iavf,igb_uio
0000:51:01.3 'Ethernet Adaptive Virtual Function 1889' drv=vfio-pci unused=iavf,igb_uio
0000:51:01.0 'Ethernet Adaptive Virtual Function 1889' drv=vfio-pci unused=iavf,igb_uio
0000:51:11.1 'Ethernet Adaptive Virtual Function 1889' drv=vfio-pci unused=iavf,igb_uio
0000:51:21.2 'Ethernet Adaptive Virtual Function 1889' drv=vfio-pci unused=iavf,igb_uio
0000:51:31.3 'Ethernet Adaptive Virtual Function 1889' drv=vfio-pci unused=iavf,igb_uio

Network devices using kernel driver
===================================
0000:19:00.0 'BCM57504 NetXtreme-E 10Gb/25Gb/40Gb/50Gb/100Gb/200Gb Ethernet 1751' if=em1 drv=bnxt_en unused=igb_uio,vfio-pci *Active*
0000:19:00.1 'BCM57504 NetXtreme-E 10Gb/25Gb/40Gb/50Gb/100Gb/200Gb Ethernet 1751' if=em2 drv=bnxt_en unused=igb_uio,vfio-pci
0000:19:00.2 'BCM57504 NetXtreme-E 10Gb/25Gb/40Gb/50Gb/100Gb/200Gb Ethernet 1751' if=em3 drv=bnxt_en unused=igb_uio,vfio-pci
0000:19:00.3 'BCM57504 NetXtreme-E 10Gb/25Gb/40Gb/50Gb/100Gb/200Gb Ethernet 1751' if=em4 drv=bnxt_en unused=igb_uio,vfio-pci
0000:51:00.0 'Ethernet Controller E810-C for QSFP 1592' if=eth13 drv=ice unused=igb_uio,vfio-pci
0000:51:00.1 'Ethernet Controller E810-C for QSFP 1592' if=rename8 drv=ice unused=igb_uio,vfio-pci
Huge Pages
When a process uses RAM, the CPU marks it as used by that process. For efficiency, the CPU allocates RAM in chunks—4K bytes is the default value on many platforms. Those chunks are named pages. Pages can be swapped to disk, etc.
Since the process address space is virtual, the CPU and the operating system need to remember which pages belong to which process, and where each page is stored. The more pages you have, the more time it takes to find where memory is mapped. When a process uses 1GB of memory, that's 262144 entries to look up (1GB / 4K). If one page table entry consume 8 bytes, that's 2MB (262144 * 8) to look up.
Most current CPU architectures support larger-than-default pages, which give the CPU/OS less entries to look-up.
Kernel parameters
To enable the huge pages we should add the next kernel parameters:
| parameter | value | description |
|---|---|---|
| hugepagesz | 1G | This options allows to set the size of huge pages to 1G |
| hugepages | 40 | This is the number of hugepages defined before |
| default_hugepagesz | 1G | This is the default value to get the huge pages |
Modify the grub file to add them to the kernel command line:
vi /etc/default/grub
GRUB_CMDLINE_LINUX="intel_iommu=on intel_pstate=passive processor.max_cstate=1 intel_idle.max_cstate=0 iommu=pt usbcore.autosuspend=-1 selinux=0 enforcing=0 nmi_watchdog=0 crashkernel=auto softlockup_panic=0 audit=0 mce=off hugepagesz=1G hugepages=40 hugepagesz=2M hugepages=0 default_hugepagesz=1G kthread_cpus=0,31,32,63 irqaffinity=0,31,32,63 isolcpu=1-30,33-62 skew_tick=1 nohz_full=1-30,33-62 rcu_nocbs=1-30,33-62 rcu_nocb_poll"
Usage of huge pages
In order to use the huge pages we need to mount them:
mkdir -p /hugepages
mount -t hugetlbfs nodev /hugepages
Now you could deploy your kubernetes workload creating the resources as well as the volumes:
...
 resources:
   requests:
     memory: "24Gi"
     hugepages-1Gi: 16Gi
     intel.com/intel_sriov_oru: '4'
   limits:
     memory: "24Gi"
     hugepages-1Gi: 16Gi
     intel.com/intel_sriov_oru: '4'
...
...
volumeMounts:
  - name: hugepage
    mountPath: /hugepages
...
volumes:
  - name: hugepage
    emptyDir:
      medium: HugePages
...
CPU Pinning Configuration
Requirements
- You must have the CPU tuned to the performance profile covered on this section
- You must have the RKE2 cluster kubelet configured with the cpu management arguments covered on this section
Use CPU Pinning on kubernetes
There are three ways to use that feature using the Static Policy defined in kubelet depending on the requests and limits you define on your workload:
BestEffortQoS Class: If you don't define any request or limit for CPU, the pod will be scheduled on the first CPU available on the system.
An example to use the BestEffort QoS Class could be:
spec:
  containers:
  - name: nginx
    image: nginx
BurstableQoS Class: If you define a request for CPU, which is not equal to the limits, or maybe there is no CPU request.
Examples to use the Burstable QoS Class could be:
spec:
  containers:
  - name: nginx
    image: nginx
    resources:
      limits:
        memory: "200Mi"
      requests:
        memory: "100Mi"
or
spec:
  containers:
  - name: nginx
    image: nginx
    resources:
      limits:
        memory: "200Mi"
        cpu: "2"
      requests:
        memory: "100Mi"
        cpu: "1"
GuaranteedQoS Class: If you define a request for CPU, which is equal to the limits.
An example to use the Guaranteed QoS Class could be:
spec:
  containers:
    - name: nginx
      image: nginx
      resources:
        limits:
          memory: "200Mi"
          cpu: "2"
        requests:
          memory: "200Mi"
          cpu: "2"
NUMA Aware scheduling
Non-Uniform Memory Access or Non-Uniform Memory Architecture (NUMA) is a physical memory design used in SMP (multiprocessors) architecture, where the memory access time depends on the memory location relative to a processor. Under NUMA, a processor can access its own local memory faster than non-local memory, that is, memory local to another processor or memory shared between processors.
Identify NUMA nodes
To identify the NUMA nodes on your system you can use the next command:
numactl --hardware
available: 1 nodes (0)
node 0 cpus: 0 1 2 3 4 5 6 7 8 9 10 11 12 13 14 15 16 17 18 19 20 21 22 23 24 25 26 27 28 29 30 31 32 33 34 35 36 37 38 39 40 41 42 43 44 45 46 47 48 49 50 51 52 53 54 55 56 57 58 59 60 61 62 63
node 0 size: 257167 MB
node 0 free: 246390 MB
node distances:
node   0
  0:  10
Note: In this case we have only one NUMA node
NUMA has to enabled in the BIOS. If dmesg does not have records of numa initialization during bootup, then it is possible that NUMA related messages in the kernel ring buffer might have been overwritten.
VRAN Acceleration (Intel ACC100)
As communications service providers move from 4G to 5G networks, many are adopting virtualized radio access network (vRAN) architectures for higher channel capacity and easier deployment of edge-based services and applications. vRAN solutions are ideally located to deliver low-latency services with the flexibility to increase or decrease capacity based on the volume of real-time traffic and demand on the network.
Kernel parameters
To enable the vRAN acceleration we need to enable the following kernel parameters (if not present yet):
| parameter | value | description |
|---|---|---|
| iommu | pt | This option allows to use vfio for the dpdk interfaces |
| intel_iommu | on | This option enables to use vfio for VFs. |
Modify the grub file to add them to the kernel command line:
vi /etc/default/grub
GRUB_CMDLINE_LINUX="intel_iommu=on intel_pstate=passive processor.max_cstate=1 intel_idle.max_cstate=0 iommu=pt usbcore.autosuspend=-1 selinux=0 enforcing=0 nmi_watchdog=0 crashkernel=auto softlockup_panic=0 audit=0 mce=off hugepagesz=1G hugepages=40 hugepagesz=2M hugepages=0 default_hugepagesz=1G kthread_cpus=0,31,32,63 irqaffinity=0,31,32,63 isolcpu=1-30,33-62 skew_tick=1 nohz_full=1-30,33-62 rcu_nocbs=1-30,33-62 rcu_nocb_poll"
Then you need to update the grub configuration and reboot the system to apply the changes:
transactional-update grub.cfg
reboot
To validate that the parameters are applied after the reboot you can check the command line:
cat /proc/cmdline
Load igb_uio and vfio-pci kernel modules
modprobe igb_uio
modprobe vfio-pci
Get interface information Acc100
Maybe in some cases (depending on the OS) you should add to the path the /sbin/ for the lspci command doing:
export PATH=$PATH:/sbin/
lspci | grep -i acc
8a:00.0 Processing accelerators: Intel Corporation Device 0d5c
Bind the PF with igb_uio module
dpdk-devbind.py -b igb_uio 0000:8a:00.0
Create the VFs from the PF
To create 2 vfs from the PF and bind with vfio-pci follow the next steps:
echo 2 > /sys/bus/pci/devices/0000:8a:00.0/max_vfs
dpdk-devbind.py -b vfio-pci 0000:8b:00.0
Configure acc100 with the proposed configuration file
pf_bb_config ACC100 -c /opt/pf-bb-config/acc100_config_vf_5g.cfg
Tue Jun  6 10:49:20 2023:INFO:Queue Groups: 2 5GUL, 2 5GDL, 2 4GUL, 2 4GDL
Tue Jun  6 10:49:20 2023:INFO:Configuration in VF mode
Tue Jun  6 10:49:21 2023:INFO: ROM version MM 99AD92
Tue Jun  6 10:49:21 2023:WARN:* Note: Not on DDR PRQ version  1302020 != 10092020
Tue Jun  6 10:49:21 2023:INFO:PF ACC100 configuration complete
Tue Jun  6 10:49:21 2023:INFO:ACC100 PF [0000:8a:00.0] configuration complete!
Check the new VFs created from the FEC PF:
dpdk-devbind.py -s
...
...
...
Baseband devices using DPDK-compatible driver
=============================================
0000:8a:00.0 'Device 0d5c' drv=igb_uio unused=vfio-pci
0000:8b:00.0 'Device 0d5d' drv=vfio-pci unused=igb_uio

Other Baseband devices
======================
0000:8b:00.1 'Device 0d5d' unused=igb_uio,vfio-pci
Metal LB (Beta)
TBC