Intro
In this guide, we'll show you how to implement host-level NVIDIA GPU support via the pre-built open-source drivers on SLE Micro 5.3+. In other words, drivers that are baked into the operating system rather than dynamically loaded by NVIDIA's GPU Operator. This configuration is highly desirable for customers that want to pre-bake all artefacts required for deployment into the image, and where the dynamic selection of the driver version, i.e. the user is selecting the version of the driver via Kubernetes, is not a requirement. This guide initially explains how to deploy the additional components onto a system that has already been pre-deployed, but follows with a section that describes how to embed this configuration into the initial deployment via Edge Image Builder. If you do not want to run through the basics and standing things up manually, skip right ahead to that section.
It's important to call out that the support for these drivers is provided by both SUSE and NVIDIA in tight collaboration, where the driver is built and shipped by SUSE as part of the package repositories, however if you have any concerns or questions about the combination in which you're utilising the drivers, then please ask your SUSE or NVIDIA account managers for further assistance. If you're planning on utilising NVIDIA AI Enterprise (NVAIE) you will need to ensure that you're using an NVAIE certified GPU, which may require the use of proprietary NVIDIA drivers. If you're unsure, please speak with your NVIDIA representative.
Further information about NVIDIA GPU operator integration is not covered in this guide, however should you want to utilise the GPU Operator for Kubernetes integration, it should still be possible to follow much of the steps in this guide to setup the underlying operating system and simply enabling the GPU operator to utilise the pre-installed drivers via the driver.enabled=false flag in the NVIDIA GPU Operator Helm chart, where it will simply pick-up the already installed drivers on the host; more comprehensive instructions are available from NVIDIA here. SUSE recently also made a Technical Reference Documentation (TRD) available that discusses how to utilise the GPU operator and the NVIDIA proprietary drivers, should this be a requirement for your use-case.
Prerequisites
If you're following this guide, it's assumed that you've got the following already available:
- At least one host with SLE Micro 5.3+ installed; this can be physical or virtual.
- Your host(s) is/are attached to a subscription as this will be required for package access - an evaluation is available here.
- A compatible NVIDIA GPU installed (or fully passed through to the virtual machine in which SLE Micro is running).
- Access to the root user - these instructions assume you're the root user, and not escalating your privileges via
sudo.
Manual Installation
In this section you're going to install the NVIDIA drivers directly onto the SLE Micro operating system as the NVIDIA open-driver is now part of the core SLE Micro package repositories, which makes it as easy as installing the required RPM packages; there is no compilation or downloading of executable packages required. Below we're going to walk through the deployment of the "G06" generation of driver, which supports the latest GPU's (please see here for further information), so please ensure that you're selecting an appropriate driver generation for the NVIDIA GPU that your system has. If it's a modern GPU, it's highly likely that "G06" will be the correct driver.
Before we begin, it's important to recognise that in addition to the NVIDIA open-driver that SUSE ship as part of SLE Micro, it's more than likely that to support the installation you're going to want to install additional NVIDIA components, for example, OpenGL libraries, CUDA toolkits, command-line utilities such as nvidia-smi, and container-integration components such as the nvidia-container-toolkit. Many of these components are not shipped by SUSE as they're either proprietary NVIDIA software, or it makes no sense for us to ship them instead of NVIDIA. Therefore, as part of the instructions we're going to be configuring some additional repositories that give us access to said components, and we'll walk through some examples of how to leverage some of these tools, resulting in a fully-functional system. It's important to make this distiction between SUSE repositories and NVIDIA repositories, as occasionally there can be a mismatch between the package versions that NVIDIA make available versus what SUSE has built, this usually arrises when SUSE make a new version of the open-driver available, and there's a couple of days before the equivalent packages are made available in NVIDIA repositories to match.
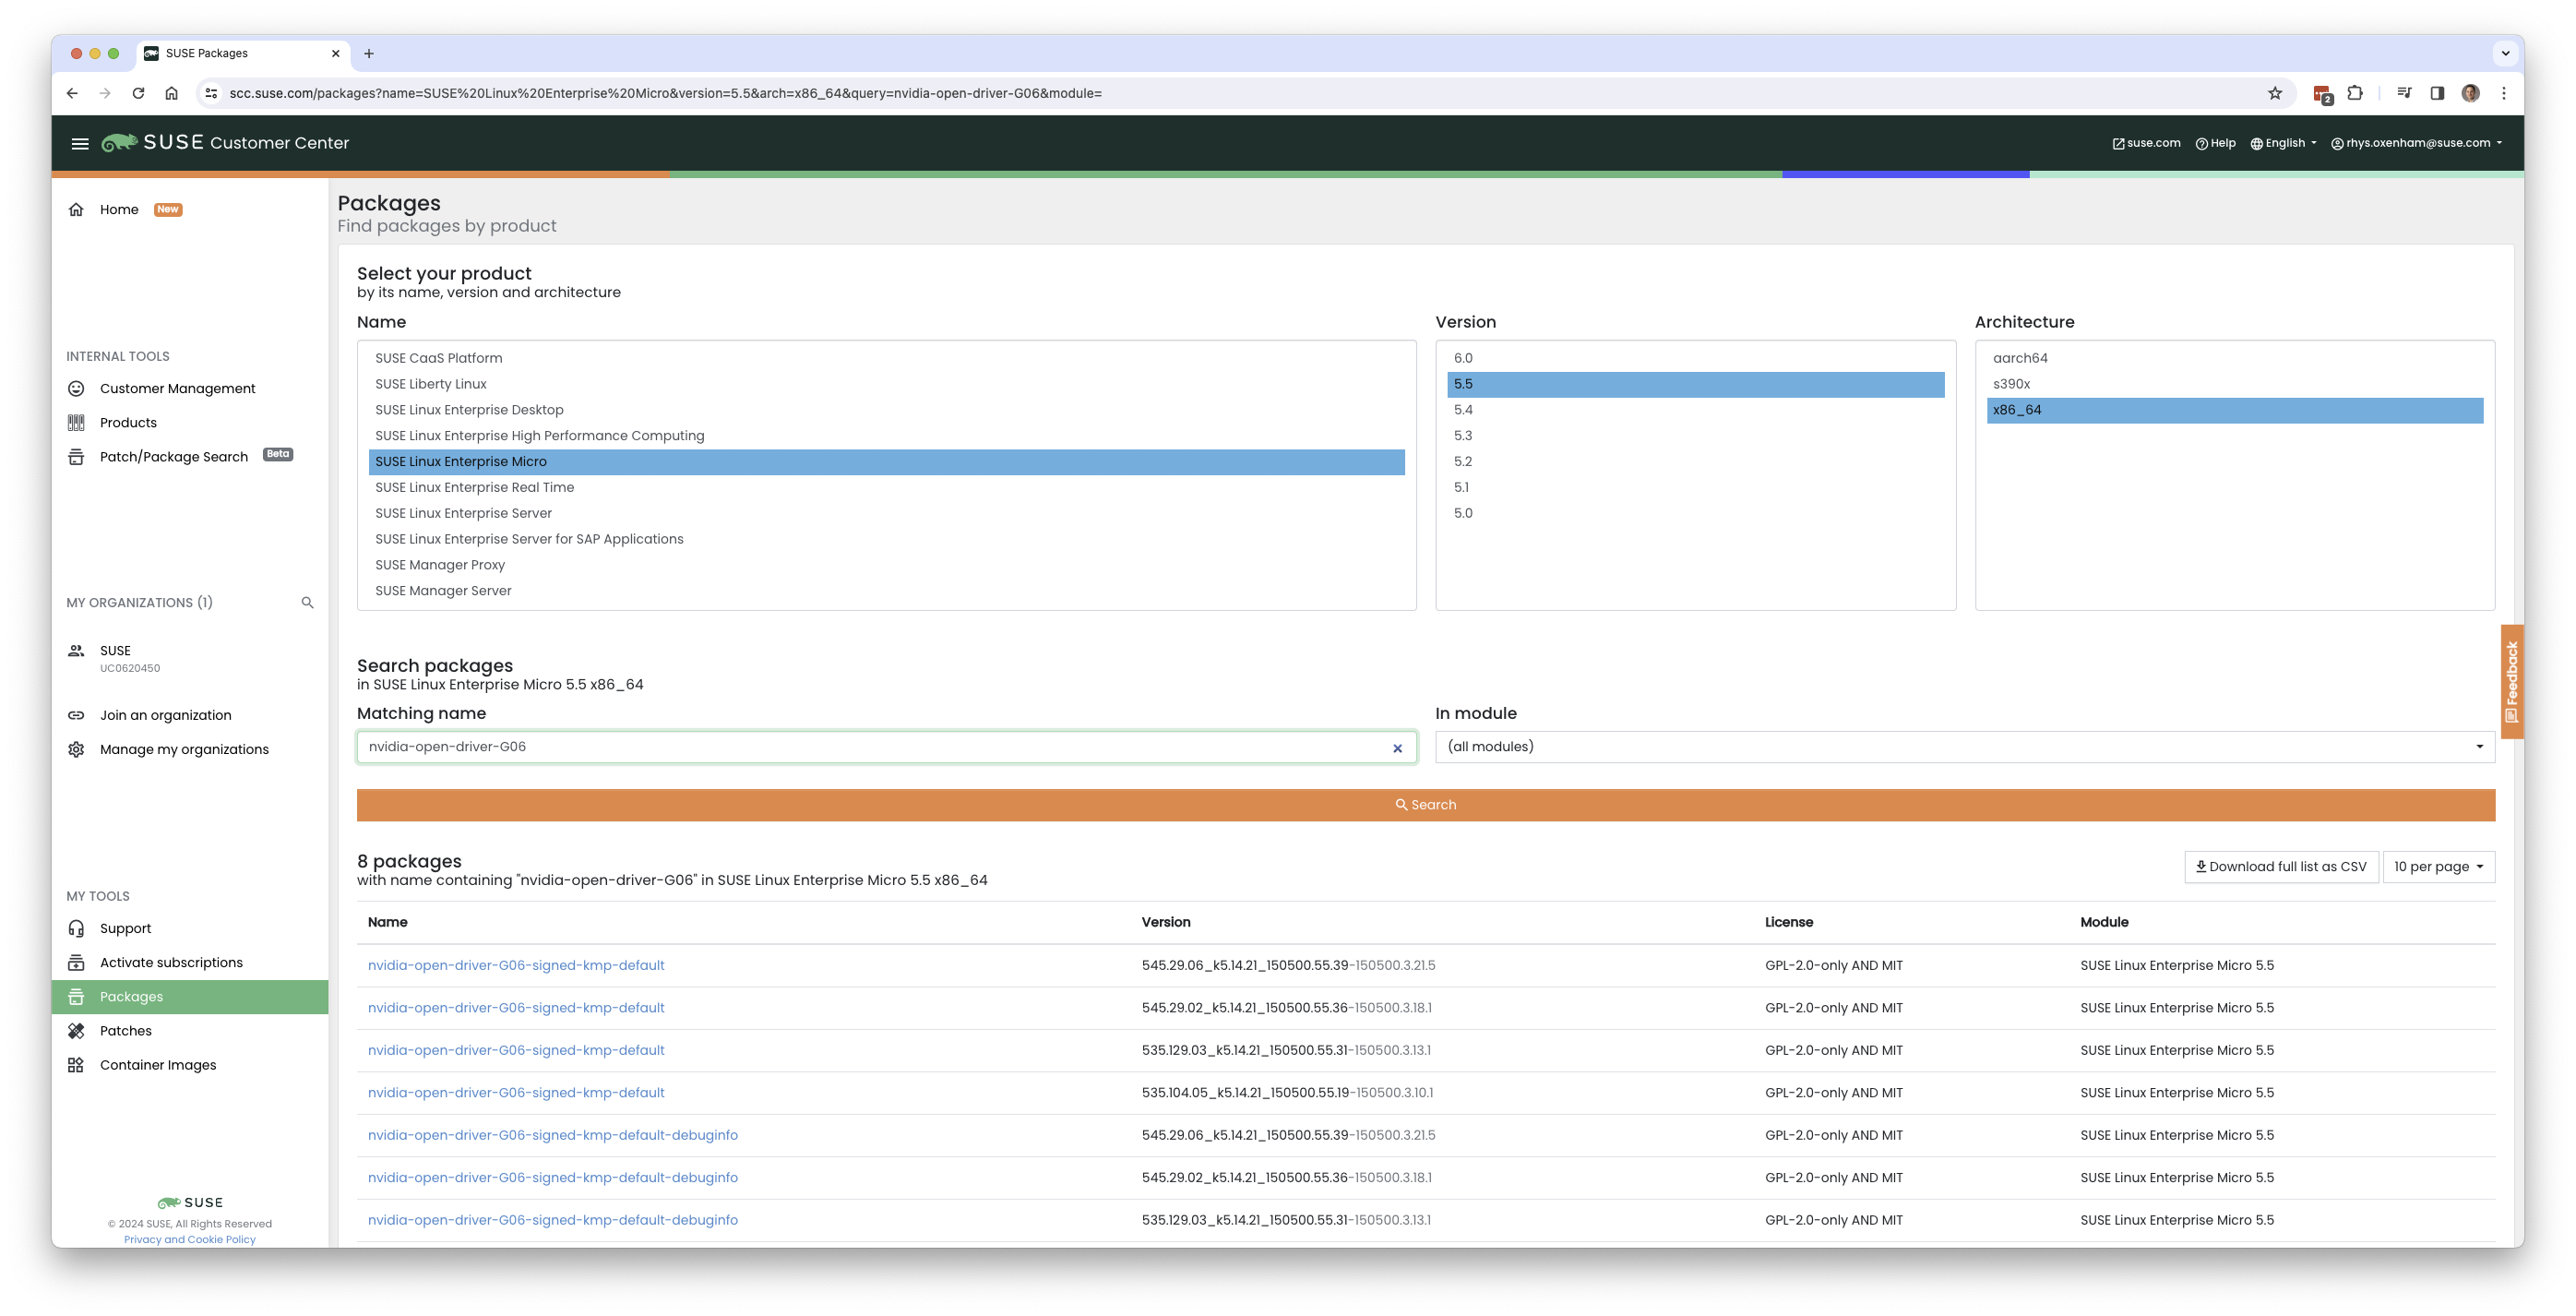
Therefore, what's advised is that you not only ensure that the driver version that you're selecting is compatible with your GPU, and meets any CUDA requirements that you may have by checking the CUDA release notes, that the driver version that you plan on deploying also has a matching version in the NVIDIA SLE15-SP5 repository to ensure that you will have equivalent package versions for the supporting components available. The easiest way to check the available versions of the NVIDIA open-driver is to search on SUSE Customer Centre by looking at all of the packages available in SLE Micro 5.5 for x86_64 and searching for the "nvidia-open-driver", here you'll see that there are four versions available, with 545.29.06 being the newest:
NOTE: The same could have been achieved on the target machine by executing
zypper se -s nvidia-open-driver.
When you've confirmed that an equivalent version is available in the NVIDIA repos, you're ready to install the packages on the host operating system, and for this we need to open up a transactional-update session, which creates a new read/write snapshot of the underlying operating system so we can make changes to the immutable platform (for further instructions on transactional-update see here):
transactional-update shell
When you're in your transactional-update shell, add an additional package repository from NVIDIA; this will allow us to pull in additional utilities, e.g. nvidia-smi:
zypper ar https://download.nvidia.com/suse/sle15sp5/ nvidia-sle15sp5-main
zypper --gpg-auto-import-keys refresh
You can then install the driver and the nvidia-compute-utils for additional utilities, note that if you don't need the utils you can omit it, but for testing purposes it's worth installing at this stage:
zypper install -y --auto-agree-with-licenses nvidia-open-driver-G06-signed-kmp nvidia-compute-utils-G06
NOTE: If this fails to install it's likely that there's a dependency mismatch between the selected driver version and what NVIDIA is shipping in their repositories - please revisit the section above to validate that your versions match. You may want to attempt to install a different driver version, for example, if the NVIDIA repositories have an earlier version, you can try specifying
nvidia-open-driver-G06-signed-kmp=545.29.06on your install command to specify a version that aligns.
Next, if you're not using a supported GPU, remembering that the list can be found here, you can see if the driver will work by enabling support at the module level, but your mileage may vary -- skip this step if you're using a supported GPU:
sed -i '/NVreg_OpenRmEnableUnsupportedGpus/s/^#//g' /etc/modprobe.d/50-nvidia-default.conf
Now that you've installed these packages, it's time to exit the transactional-update session:
exit
NOTE: Please make sure that you've exited the
transactional-updatesession before proceeding!
Now that you've got your drivers installed, it's time to reboot, as SLE Micro is an immutable operating system it needs to reboot into the new snapshot that you created in a previous step; the drivers are only installed into this new snapshot, and hence it's not possible to load the drivers without rebooting into this new snapshot, which will happen automatically. Issue the reboot command when you're ready:
reboot
Once the system has rebooted successfully, log back in and try to use the nvidia-smi tool to verify that the driver is loaded successfully and that it's able to both access and enumerate your GPU(s):
nvidia-smi
The output of this command should show you something similar to the following output, noting that in the example below we have two GPU's:
Wed Feb 28 12:31:06 2024
+---------------------------------------------------------------------------------------+
| NVIDIA-SMI 545.29.06              Driver Version: 545.29.06    CUDA Version: 12.3     |
|-----------------------------------------+----------------------+----------------------+
| GPU  Name                 Persistence-M | Bus-Id        Disp.A | Volatile Uncorr. ECC |
| Fan  Temp   Perf          Pwr:Usage/Cap |         Memory-Usage | GPU-Util  Compute M. |
|                                         |                      |               MIG M. |
|=========================================+======================+======================|
|   0  NVIDIA A100-PCIE-40GB          Off | 00000000:17:00.0 Off |                    0 |
| N/A   29C    P0              35W / 250W |      4MiB / 40960MiB |      0%      Default |
|                                         |                      |             Disabled |
+-----------------------------------------+----------------------+----------------------+
|   1  NVIDIA A100-PCIE-40GB          Off | 00000000:CA:00.0 Off |                    0 |
| N/A   30C    P0              33W / 250W |      4MiB / 40960MiB |      0%      Default |
|                                         |                      |             Disabled |
+-----------------------------------------+----------------------+----------------------+

+---------------------------------------------------------------------------------------+
| Processes:                                                                            |
|  GPU   GI   CI        PID   Type   Process name                            GPU Memory |
|        ID   ID                                                             Usage      |
|=======================================================================================|
|  No running processes found                                                           |
+---------------------------------------------------------------------------------------+
...and that's it! You've successfully installed and verified that the NVIDIA drivers are loaded into SLE Micro.
Further Validation of the Manual Installation
At this stage, all we've been able to verify is that at the host level the NVIDIA device can be accessed and that the drivers are loading successfully. However, if we want to be sure that it's functioning, a simple test would be to try and validate that the GPU can take instruction from a user-space application, ideally via a container, and through the CUDA library, as that's typically what a real workload would utilise. For this, we can make a further modification to the host OS by installing the nvidia-container-toolkit (NVIDIA Container Toolkit). First, open up another transactional-update shell, noting that we could have done this in a single transaction in the previous step, and we'll show how to do this fully automated in a later section:
transactional-update shell
Next, install the nvidia-container-toolkit package from the NVIDIA Container Toolkit repo:
- The
nvidia-container-toolkit.repobelow contains a stable (nvidia-container-toolkit) and experimental (nvidia-container-toolkit-experimental) repository. The stable repository is recommended for production use. The experimental repository is disabled by default.
zypper ar https://nvidia.github.io/libnvidia-container/stable/rpm/nvidia-container-toolkit.repo
zypper --gpg-auto-import-keys install -y nvidia-container-toolkit
When you're ready, you can exit the transactional-update shell:
exit
...and reboot the machine into the new snapshot:
reboot
NOTE: As before, you will need to ensure that you've exited the
transactional-shelland rebooted the machine for your changes to be enacted.
Now that the machine has rebooted, you can validate that the system is able to successfully enumerate the devices via the NVIDIA Container Toolkit (the output should be verbose, and it should provide a number of INFO and WARN messages, but no ERROR messages):
nvidia-ctk cdi generate --output=/etc/cdi/nvidia.yaml
This will ensure that any container started on the machine can leverage NVIDIA GPU devices that have been discovered. When ready, you can then run a podman-based container (doing this via podman gives us a good way of validating access to the NVIDIA device from within a container, which should give confidence for doing the same with Kubernetes at a later stage), giving it access to the labelled NVIDIA device(s) that were taken care of by the previous command, based on SLE BCI and simply running bash:
podman run --rm --device nvidia.com/gpu=all --security-opt=label=disable -it registry.suse.com/bci/bci-base:latest bash
You will now be executing commands from within a temporary podman container; it doesn't have any access to your underlying system and is ephemeral in nature so whatever we do here will not persist and you shouldn't be able to break anything on the underlying host. As we're now in a container, we can install the required CUDA libraries, again checking the correct CUDA version for your driver here although the previous output of nvidia-smi should show the required CUDA version. In the example below we're installing CUDA 12.3 and we're pulling a large number of examples, demo's, and development kits so you can fully validate the GPU:
zypper ar http://developer.download.nvidia.com/compute/cuda/repos/sles15/x86_64/ cuda-sle15-sp5
zypper in -y cuda-libraries-devel-12-3 cuda-minimal-build-12-3 cuda-demo-suite-12-3
Once this has been installed successfully, don't exit from the container, we'll run the deviceQuery CUDA example, which will comprehensively validate GPU access via CUDA, and from within the container itself:
/usr/local/cuda-12/extras/demo_suite/deviceQuery
If successful, you should see output that shows similar to the following, noting the Result = PASS message at the end of the command, noting that in the output below my system is correctly identifying two GPU's, whereas your environment may only have one:
/usr/local/cuda-12/extras/demo_suite/deviceQuery Starting...

 CUDA Device Query (Runtime API) version (CUDART static linking)

Detected 2 CUDA Capable device(s)

Device 0: "NVIDIA A100-PCIE-40GB"
  CUDA Driver Version / Runtime Version          12.2 / 12.1
  CUDA Capability Major/Minor version number:    8.0
  Total amount of global memory:                 40339 MBytes (42298834944 bytes)
  (108) Multiprocessors, ( 64) CUDA Cores/MP:     6912 CUDA Cores
  GPU Max Clock rate:                            1410 MHz (1.41 GHz)
  Memory Clock rate:                             1215 Mhz
  Memory Bus Width:                              5120-bit
  L2 Cache Size:                                 41943040 bytes
  Maximum Texture Dimension Size (x,y,z)         1D=(131072), 2D=(131072, 65536), 3D=(16384, 16384, 16384)
  Maximum Layered 1D Texture Size, (num) layers  1D=(32768), 2048 layers
  Maximum Layered 2D Texture Size, (num) layers  2D=(32768, 32768), 2048 layers
  Total amount of constant memory:               65536 bytes
  Total amount of shared memory per block:       49152 bytes
  Total number of registers available per block: 65536
  Warp size:                                     32
  Maximum number of threads per multiprocessor:  2048
  Maximum number of threads per block:           1024
  Max dimension size of a thread block (x,y,z): (1024, 1024, 64)
  Max dimension size of a grid size    (x,y,z): (2147483647, 65535, 65535)
  Maximum memory pitch:                          2147483647 bytes
  Texture alignment:                             512 bytes
  Concurrent copy and kernel execution:          Yes with 3 copy engine(s)
  Run time limit on kernels:                     No
  Integrated GPU sharing Host Memory:            No
  Support host page-locked memory mapping:       Yes
  Alignment requirement for Surfaces:            Yes
  Device has ECC support:                        Enabled
  Device supports Unified Addressing (UVA):      Yes
  Device supports Compute Preemption:            Yes
  Supports Cooperative Kernel Launch:            Yes
  Supports MultiDevice Co-op Kernel Launch:      Yes
  Device PCI Domain ID / Bus ID / location ID:   0 / 23 / 0
  Compute Mode:
     < Default (multiple host threads can use ::cudaSetDevice() with device simultaneously) >

Device 1: <snip to reduce output for multiple devices>
     < Default (multiple host threads can use ::cudaSetDevice() with device simultaneously) >
> Peer access from NVIDIA A100-PCIE-40GB (GPU0) -> NVIDIA A100-PCIE-40GB (GPU1) : Yes
> Peer access from NVIDIA A100-PCIE-40GB (GPU1) -> NVIDIA A100-PCIE-40GB (GPU0) : Yes

deviceQuery, CUDA Driver = CUDART, CUDA Driver Version = 12.3, CUDA Runtime Version = 12.3, NumDevs = 2, Device0 = NVIDIA A100-PCIE-40GB, Device1 = NVIDIA A100-PCIE-40GB
Result = PASS
From here, you can continue to run any other CUDA workload - you can utilise compilers, and any other aspect of the CUDA ecosystem to run some further tests. When you're done you can exit from the container, noting that whatever you've installed in there is ephemeral (so will be lost!), and hasn't impacted the underlying operating system:
exit
Implementation with Kubernetes
Now that we've proven the installation and utilisation of the NVIDIA open-driver on SLE Micro, let's explore how you would configure Kubernetes on the same machine to do the same. This guide will not walk you through the deployment of Kubernetes, but it's assumed that you've either installed k3s or RKE2 and that you've got your kubeconfig configured accordingly so that standard kubectl commands can be executed as the superuser. We assume that your node forms a single-node cluster, although there's no reason why the instructions would differ considerably for multi-node clusters. Firstly, ensure that your kubectl access is working:
kubectl get nodes
This should show something similar to the following:
NAME       STATUS   ROLES                       AGE   VERSION
node0001   Ready    control-plane,etcd,master   13d   v1.28.6+rke2r1
What you should find is that your k3s/rke2 installation has detected the presence of the NVIDIA Container Toolkit on the host and automatically configured the NVIDIA runtime integration into containerd (the Container Runtime Interface that k3s/rke2 utilise); this can be confirmed by looking at the containerd config.toml file:
tail -n8 /var/lib/rancher/rke2/agent/etc/containerd/config.toml
Which should show something akin to the following, note that the equivalent k3s location is /var/lib/rancher/k3s/agent/etc/containerd/config.toml:
[plugins."io.containerd.grpc.v1.cri".containerd.runtimes."nvidia"]
  runtime_type = "io.containerd.runc.v2"
[plugins."io.containerd.grpc.v1.cri".containerd.runtimes."nvidia".options]
  BinaryName = "/usr/bin/nvidia-container-runtime"
NOTE: If these entries are not present, the detection has failed and it's likely that you haven't restarted the machine, or the Kubernetes services. You can add these in manually as above, if required.
Next, we need to configure the NVIDIA RuntimeClass as an additional Kubernetes runtime to the default, ensuring that any user requests for pods that need access to the GPU can leverage the NVIDIA Container Toolkit to do so, via the nvidia-container-runtime, as configured in the containerd configuration:
kubectl apply -f - <<EOF
apiVersion: node.k8s.io/v1
kind: RuntimeClass
metadata:
  name: nvidia
handler: nvidia
EOF
The next step is to configure the NVIDIA Device Plugin which configures Kubernetes to be able to leverage the NVIDIA GPU's as resources within the cluster that can be utilised, working in combination with the NVIDIA Container Toolkit. This tool will initially detect all capabilities on the underlying host in terms of GPU's, drivers, and other capabilities (e.g. GL) and will then allow you to request GPU resources, and consume them as part of your applications.
First you'll need to add and update the Helm repository for the NVIDIA Device Plugin:
helm repo add nvdp https://nvidia.github.io/k8s-device-plugin
helm repo update
Now you can install the NVIDIA Device Plugin:
helm upgrade -i nvdp nvdp/nvidia-device-plugin --namespace nvidia-device-plugin --create-namespace --version 0.14.5 --set runtimeClassName=nvidia
After a few minutes, you should see that there's a new pod running that will complete the detection on your available node(s) and will tag them with the number of GPU's that have been detected:
kubectl get pods -n nvidia-device-plugin
NAME                              READY   STATUS    RESTARTS      AGE
nvdp-nvidia-device-plugin-jp697   1/1     Running   2 (12h ago)   6d3h

kubectl get node node0001 -o json | jq .status.capacity
{
  "cpu": "128",
  "ephemeral-storage": "466889732Ki",
  "hugepages-1Gi": "0",
  "hugepages-2Mi": "0",
  "memory": "32545636Ki",
  "nvidia.com/gpu": "1",                      <----
  "pods": "110"
}
Now you're ready to create an NVIDIA pod that attempts to utilise this GPU, let's try with the CUDA Benchmark container:
kubectl apply -f - <<EOF
apiVersion: v1
kind: Pod
metadata:
  name: nbody-gpu-benchmark
  namespace: default
spec:
  restartPolicy: OnFailure
  runtimeClassName: nvidia
  containers:
  - name: cuda-container
    image: nvcr.io/nvidia/k8s/cuda-sample:nbody
    args: ["nbody", "-gpu", "-benchmark"]
    resources:
      limits:
        nvidia.com/gpu: 1
    env:
    - name: NVIDIA_VISIBLE_DEVICES
      value: all
    - name: NVIDIA_DRIVER_CAPABILITIES
      value: all
EOF
If all went well, you should be able to look at the logs and see the benchmark information:
kubectl logs nbody-gpu-benchmark
Run "nbody -benchmark [-numbodies=<numBodies>]" to measure performance.
	-fullscreen       (run n-body simulation in fullscreen mode)
	-fp64             (use double precision floating point values for simulation)
	-hostmem          (stores simulation data in host memory)
	-benchmark        (run benchmark to measure performance)
	-numbodies=<N>    (number of bodies (>= 1) to run in simulation)
	-device=<d>       (where d=0,1,2.... for the CUDA device to use)
	-numdevices=<i>   (where i=(number of CUDA devices > 0) to use for simulation)
	-compare          (compares simulation results running once on the default GPU and once on the CPU)
	-cpu              (run n-body simulation on the CPU)
	-tipsy=<file.bin> (load a tipsy model file for simulation)

NOTE: The CUDA Samples are not meant for performance measurements. Results may vary when GPU Boost is enabled.

> Windowed mode
> Simulation data stored in video memory
> Single precision floating point simulation
> 1 Devices used for simulation
GPU Device 0: "Turing" with compute capability 7.5

> Compute 7.5 CUDA device: [Tesla T4]
40960 bodies, total time for 10 iterations: 101.677 ms
= 165.005 billion interactions per second
= 3300.103 single-precision GFLOP/s at 20 flops per interaction
Finally, if your applications require OpenGL, you can install the required NVIDIA OpenGL libraries at the host-level and the NVIDIA Device Plugin and NVIDIA Container Toolkit can make them available to containers, for this you'll need to install the package as follows:
transactional-update pkg install nvidia-gl-G06
NOTE: You will need to reboot to make this package available to your applications; the NVIDIA Device Plugin should automatically redetect this via the NVIDIA Container Toolkit.
Bringing it together via Edge Image Builder
Okay, so you've demonstrated full functionality of your applications and GPU's on SLE Micro and you now want to utilise SUSE Edge Image Builder to provision it all together via a deployable/consumable ISO or RAW disk image. This guide doesn't explain how to use Edge Image Buillder but it does provide the necessary configurations to be able to achieve such a configuration. Below you will find an example of an image definition, along with the necessary Kubernetes configuration files to ensure that all of the required components are deployed out of the box. Here's the directory structure of the Edge Image Builder directory for the example shown below:
.
├── base-images
│   ├── SLE-Micro.x86_64-5.5.0-Default-SelfInstall-GM.install.iso
├── eib-config-iso.yaml
├── kubernetes
│   ├── config
│   │   └── server.yaml
│   ├── helm
│   │   └── nvidia-device-plugin.yaml
│   └── manifests
│       └── nvidia-runtime-class.yaml
├── rpms
│   ├── gpg-keys
│   │   └── nvidia-container-toolkit.key
Let's explore those files, firstly, here's a sample image definition for a single-node cluster running k3s that deploys the utils and OpenGL packages too (eib-config-iso.yaml):
apiVersion: 1.0
image:
  arch: x86_64
  imageType: iso
  baseImage: SLE-Micro.x86_64-5.5.0-Default-SelfInstall-GM.install.iso
  outputImageName: deployimage.iso
operatingSystem:
  time:
    timezone: Europe/London
    ntp:
      pools:
        - 2.suse.pool.ntp.org
  isoConfiguration:
    installDevice: /dev/sda
    unattended: true
  users:
    - username: root
      encryptedPassword: $6$XcQN1xkuQKjWEtQG$WbhV80rbveDLJDz1c93K5Ga9JDjt3mF.ZUnhYtsS7uE52FR8mmT8Cnii/JPeFk9jzQO6eapESYZesZHO9EslD1
  packages:
    packageList:
      - nvidia-open-driver-G06-signed-kmp-default
      - nvidia-compute-utils-G06
      - nvidia-gl-G06
      - nvidia-container-toolkit
    additionalRepos:
      - url: https://download.nvidia.com/suse/sle15sp5/
      - url: https://nvidia.github.io/libnvidia-container/stable/rpm/x86_64
    sccRegistrationCode: <snip>
kubernetes:
  version: v1.28.6+k3s1
NOTE: This is just an example, you will need to modify to fit your requirements and expectations and you will need to provide your own
sccRegistrationCodehere if using SLE Micro to resolve package dependencies and pull the NVIDIA drivers.
In addition to this, we need to add some additional components so they get loaded by Kubernetes at boot time. The EIB directory needs a kubernetes directory first with some sub-directories for the configuration, helm charts, and any additional manifests required:
mkdir -p kubernetes/config kubernetes/helm kubernetes/manifests
Let's now set the (optional) Kubernetes configuration up, and for this it's simple, choosing a CNI (which defaults to Cilium if unselected anyway) and enabling SELinux:
cat << EOF > kubernetes/config/server.yaml
cni: cilium
selinux: true
EOF
Now let's ensure that the NVIDIA RuntimeClass is created on the Kubernetes cluster:
cat << EOF > kubernetes/manifests/nvidia-runtime-class.yaml
apiVersion: node.k8s.io/v1
kind: RuntimeClass
metadata:
  name: nvidia
handler: nvidia
EOF
We'll leverage the built-in Helm Controller to deploy the NVIDIA Device Plugin through Kubernetes itself; we provide the configuration, and it will be applied at boot:
cat << EOF > kubernetes/helm/nvidia-device-plugin.yaml
---
apiVersion: v1
kind: Namespace
metadata:
  name: nvidia-device-plugin
---
apiVersion: helm.cattle.io/v1
kind: HelmChart
metadata:
  name: nvidia-device-plugin
  namespace: nvidia-device-plugin
spec:
  repo: https://nvidia.github.io/k8s-device-plugin
  chart: nvidia-device-plugin
  targetNamespace: nvidia-device-plugin
  version: v0.14.5
  set:
    runtimeClassName: nvidia
    allowDefaultNamespace: "true"
EOF
NOTE: We use
allowDefaultNamespace: "true"in the above example only for initial template parsing during the image build process so we can identify the required images that need to be pulled into the Embedded Registry for air-gapping purposes (default behaviour for Edge). When the template is deployed at boot time, thetargetNamespacewill be used instead.
We'll need to grab the NVIDIA Container Toolkit RPM public key before proceeding:
mkdir -p rpms/gpg-keys
curl -o rpms/gpg-keys/nvidia-container-toolkit.key https://nvidia.github.io/libnvidia-container/gpgkey
All of the required artefacts, including Kubernetes binary, container images, Helm charts (and any referenced images) will be automatically air-gapped, meaning that the systems at deploy time should require no internet connectivity by default. Now you need only grab the SLE Micro ISO from the SUSE Downloads Page (and place it in the base-images directory), and you can call the Edge Image Builder tool to generate the ISO for you. To complete the example, here's the command that was used to build the image:
podman run --rm --privileged -it -v /path/to/eib-files/:/eib eib:dev build \
  -config-file eib-config-iso.yaml -config-dir /eib -build-dir /eib/_build
For further instructions, please see the documentation for Edge Image Builder.
Resolving issues
nvidia-smi does not find the GPU
Check the kernel messages using dmesg. In case this indicates that it fails to allocate NvKMSKapDevice, then apply the unsupported GPU workaround:
sed -i '/NVreg_OpenRmEnableUnsupportedGpus/s/^#//g' /etc/modprobe.d/50-nvidia-default.conf
NOTE: You will need to reload the kernel module, or reboot, if you change the kernel module configuration in the above step for it to take effect.